Spotlights are special features that make your site more visually appealing and user friendly.
Basic Spotlight
Basic spotlights can be a great way to showcase information that you may not want in the main text of your site, such as news and upcoming events.
Part one: Creating your block
1. In the admin toolbar, hover your cursor over Content.
2. Pull your cursor down, and place it over Add content.
3. Click on Basic spotlight (block).

4. Type your block title in the Title box.
5. Type your text or copy and paste in the Body box.
6. Add an image or a video. To add an image, click the Select Media button. To add a video, paste the YouTube or Vimeo URL in the Video URL field.
7. Click Save at the bottom of the window.
Part two: Adding the block to your page
1. In the admin toolbar, hover your cursor over Structure.
2. Pull your cursor down, and click on Blocks.
3. Scroll down until you see the block that you created.
4. Click Configure next to your block.
5. Under Region Settings in the Ragin Cajun Subsite Theme drop down menu, select Sidebar Second.
6. Scroll down to the Visibility settings.
7. Select your preferences under the Show block on specific pages.
* See Visibility Settings for additional information.
8. Click Save block.
Editing a basic spotlight
Just like the rest of the content, blocks will need to be updated regularly.
1. Navigate to a page that contains a spotlight.
2. Click on the sprocket icon in the top right corner of the block.
3. Select Edit.

4. Update your content.
5. Select Save.
Quick Links Box
Depending on your office/department, you may have information on your site that is accessed frequently. You can create a quick links list to help users easily find commonly requested information. You will want to use these sparingly and only for your most important links.
Part one: Creating the quick links box
1. In the admin toolbar, hover your cursor over Content.
2. Pull your cursor down, and place it over Add content.
3. Click on Quick Links (Block).
4. The text you enter in the Title box will display above the link list.
5. Enter your link title and URL.
• Click Search to locate and link to a page within your site.

6. Click Add another item to add more links (maximum of eight).
7. If you would like to reorder the slides, click on the compass arrow next to the slide title and drag the slide to your desired location.
8. Click Save.
Part two: Adding the quick links box to your page
1. In the admin toolbar, hover your cursor over Structure.
2. Pull your cursor down, and click on Blocks.
3. Scroll down until you see the link list that you created.
4. Click on Configure.
5. Leave the Block title box blank.
6. Scroll down to Ragin Cajun Sub-Site Theme (default theme) and click the drop down arrow.
7. Select Sidebar Second.
8. Select your preferences under the Show block on specific pages.
* See Visibility Settings for additional information.
9. Click Save block.
Editing the quick links box
1. Click on the sprocket icon in the top right corner of the quick links box.
2. Select Edit.
3. Delete, add, edit, and reorder links as desired.
4. Click Save.
Accordion Menu
Accordion menus are another interactive way to display information. Tabs will appear stacked, but when you click on one, the box will expand (like an accordion) and display a picture, links, and more text. You can include a maximum of 5 tabs. Just like with other features, you will want to use the accordion menu sparingly to maintain effectiveness. You do not need to submit these photos to Communication and Marketing. You will need to size your photos to 165 pixels x 110 pixels. To do this, you can use an editing program such as Sumo Paint (available for free at www.sumopaint.com) or Adobe Photoshop.
Part one: Creating the accordion menu
1. In the admin toolbar, hover your cursor over Content.
2. Pull your cursor down, and place it over Add content.
3. Click on Accordion Menu (Block).
4. The text you enter in the Title box will display above the menu.
5. The Tab Title should be short and specific.
6. Enter your Tab Body text and include hyperlinks to pertinent information.

7. If desired, you can include a link below your text instead of hyperlinking information. To do this, add a link title (i.e. More Info) and URL in the Tab Link section.
8. Click on Select media to locate your image.
9. Click Browse and locate the image on your computer.
10. Click Open.
11. Click Submit.
12. Click Save.
13. Click on Add another item to add another tab. Repeat this process until you have created your desired number of tabs (maximum of five).
14. Click Save.
Part two: Adding the accordion menu to your page
1. In the admin toolbar, hover your cursor over Structure.
2. Pull your cursor down, and click on Blocks.
3. Scroll down until you see the accordion menu that you created.
4. Click on Configure.
5. Type “” in the Block title box.
6. Scroll down to Ragin Cajun Sub-Site Theme (default theme) and click the drop down arrow.
7. Select Sidebar Second.
8. Select your preferences under the Show block on specific pages.
a. The home page is “.”
b. A main link page would be “content/nameofthepage.”
c. Putting “*” after the name of a page will include any of the subpages in that page.
For example if you didn’t want the picture to show on About Us or any of its subpages, you would click the radial button (dot) next to “All pages except those listed” and type “content/about-us*” in the box.
9. Click Save block.
Editing the accordion menu
1. Click on the sprocket icon in the top right corner of the menu.
2. Select Edit.

3. Delete, add, edit, and reorder tabs as desired.
4. Click Save.
Slideshows
Slideshows can be set to appear in the secondary sidebar area to the right of the page content and are another way to dynamically display information. You can include a maximum of ten slides in the slideshow. You will need to size your photos to 310 pixels by 211 pixels. To do this, you can use an editing program such as Sumo Paint (available for free at www.sumopaint.com) or Adobe Photoshop.
Part one: Create each slide
1. In the admin toolbar, hover your cursor over Content.
2. Pull your cursor down, and place it over Add content.
3. Click on General Purpose Slide.

4. Type the name of the slide in the Title box. It is a good practice to add “-slide” at the end of the title so that it will be easy to locate later. The title will not show on the slideshow.
5. Type your text in the Headline box. This should be short and will appear below the picture.
6. Enter any details related to the picture in the Body box.

7. Click on Select media to locate your image.
8. Click Browse and locate the image on your computer.
9. Click Open.
10. Click Submit.
11. Click Save.
Repeat this process until you have the desired number of slides (maximum of ten).
Part two: Creating the slideshow
1. In the admin toolbar, hover your cursor over Content.
2. Pull your cursor down, and place it over Add content.
3. Click on Slideshow Small (Block).
4. Enter a specific slideshow title in the Title box.
5. In the Slides text box, begin typing the name of a slide you created earlier (If you named your slide with “-slide” at the end, you can type “slide” into the text box, and all of your slides will appear for selection.)
6. Click on the desired slide’s title when it appears.
7. Click Add another item, and repeat the process for the rest of your slides.
8. If you would like to reorder the slides, click on the compass arrow next to the slide title and drag the slide to your desired location.

9. If you want the slides to automatically cycle through, check the box next to Cycle.
10. Set your desired cycle time.
11. Click Save.
Part three: Adding the slideshow to your page
1. In the admin toolbar, hover your cursor over Structure.
2. Pull your cursor down, and click on Blocks.
3. Scroll down until you see the slideshow that you created.
4. Click on Configure.
5.The Block title box should be left blank.

6. Scroll down to Ragin Cajun Sub-Site Theme (default theme) and click the drop down arrow.
7. Select Sidebar Second.
8. Select your preferences under the Show block on specific pages.
* See Visibility Settings for additional information.
9. Click Save block.
Editing a slideshow
1. Click on the sprocket icon in the top right corner of the slideshow.

2. Select Edit.
3. Delete, add, and reorder slides as desired and make any necessary adjustments to your cycling preferences.
4. Click Save.
Visibility Settings
Determine the pages on which you would like the spotlight to appear.
- If you would like the spotlight to show up on most of your pages, choose “All pages except those listed.”
- If you would like to the spotlight to show up on one or just a couple of pages, choose “Only the listed pages.”
- If it needs to appear on all of your pages, select “All pages except those listed” and leave the box blank.
Page Codes
Home page= <front>
Menu page= nameoflink
- The best way to find the name of the link is to click on the menu link and look at the last part of the URL.
- Use “-” in the place of any spaces.
For example, to display a spotlight on the Get Involved page on the Web Ambassador site, copy the part of the URL after the main site name: get-involved

Main menu page and corresponding subpages= nameoflink*
- The “*” includes all subpages of the page listed
Unpublishing a Spotlight
There are times that you may want unpublish (or disable) a spotlight feature so that a user can not see it.
To Unpublish/ Disable a Spotlight:
1. In the admin toolbar, hover your cursor over Structure.
2. Click on Blocks.
3. Scroll down until you see the spotlight you want to disable, and click the drop down arrow to the right of the title.
4. Select None.
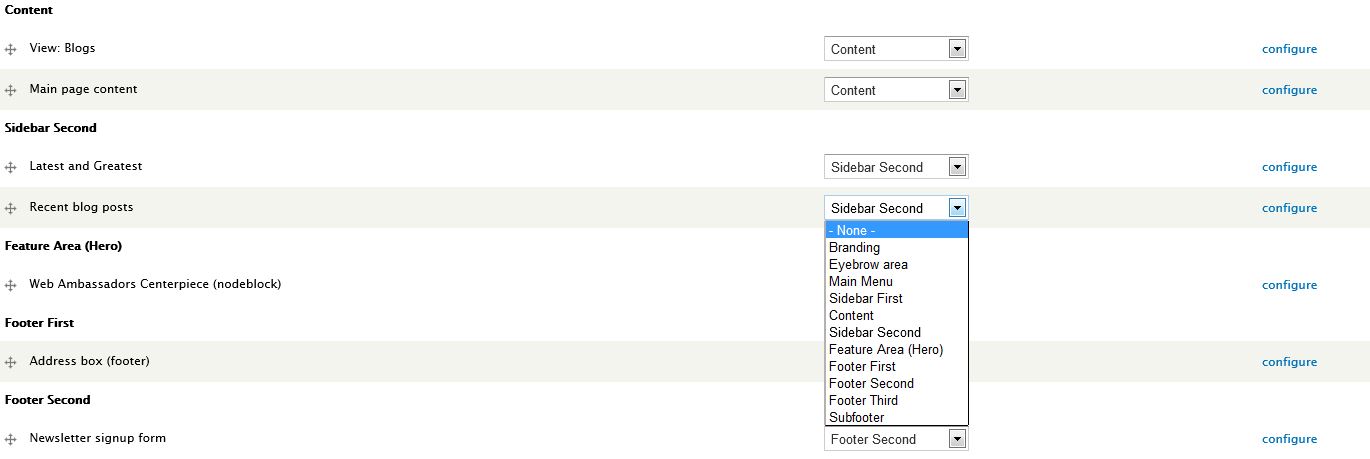
5. Click Save Blocks.
To Republish/ Reenable a Spotlight:
1. In the admin toolbar, hover your cursor over Structure.
2. Click on Blocks.
3. Scroll down until you see the spotlight you want to enable, and click the drop down arrow to the right of the title.
4. Select the appropriate region (most likely Sidebar Second).
5. Click Save Blocks.