Pages, pages everywhere! Your site is all about pages. They should be filled with well thought out content that is relevant to your users.
The following tutorials will tell you everything you need to know about building and maintaining all of your pages on the old Ragin' CMS platform.
Unpublishing/Publishing a Page
Editing Text
Content will need to be updated regularly. There are two basic ways to update pages.
The edit tab
1. Using the main menu, go to the page you want to edit.
2. Click the Edit tab above the content window in the page admin tabs.
3. Make your changes and press Save at the bottom of the screen.
The edit content operation
1. Click Content in the admin toolbar at the top of the page.
2. Browse through the content until you find your page.
3. Click edit next to the page title in the operations column.
4. Make your changes and press Save at the bottom of the screen.
Formatting Text
In the edit page window, you will find some of the most common formatting tools available to you in most word processing programs. There are some important tools to note.
1. Paste from Word: Click this button before pasting from Microsoft Word and some of the formatting will be cleaned up for you.
2. Spell check: Correct spelling is crucial for any website, especially a University’s site. Always spell check your work and have another person proof it before you publish the content.
3. Spell check while typing: Clicking on this will allow you to view misspelled words while typing.
4. Bold, italic, and underline tools can make key text stand out. Be sure to be consistent throughout your site when using them.
5. Bulleted and numbered lists make it easy to locate information and keep text from being to wordy.
6. Indenting text is another way to help the user locate information easily. Again, consistency is key.
7. Alignment tools can help adjust the placement of text to give your page a better flow and make it more visually appealing. Always be consistent with this.
8. The format box allows you to select from preformatted text options. Using this feature, especially with headings and subheadings, will allow you to maintain consistency within your text throughout your site. It also makes it easy for users to quickly locate information.
9. The Linkit tool allows you to easily link to other pages within your site.
10. Hyperlinks can bring users to information without unnecessary steps. You can link to external sites or pages within your site.
Editing Footer Text
On occasion, you may need to edit your page footer. The basic content and arrangement of the footer information should never be changed. You can update the Connect with menu to provide links to your office/department’s social media pages. You can also update your address, phone number, and email address in the event that this information changes.
1. Scroll down to the bottom of the page.
2. Click on the sprocket icon at the top of the block you want to edit.
3. Select Edit box.

4. Make your desired changes.
5. Select Save.
Filtering Content
As your site expands, it may become time consuming to look through your content to find something. Using the filter feature can be a very efficient way to search.
1. In the admin toolbar, click on Content.
2. Select the item type from the drop down menu.

3. Select Filter.
To remove filtering criteria, click Reset.
Adding a Document
Sometimes you will have a large document that you need users to be able to access. You should try to incorporate most of your information as text in your site. For example, you would probably not want to provide a link to a three page document unless it is a form. You would just incorporate that information directly into your site as text.
If you choose to upload a document for users to download, keep in mind that it should be in a format that is freely viewable, such as a .pdf. Putting a link to an Adobe Reader download page may be helpful to the user.
1. Navigate to the page in which you want to link the file.
2. Select the Edit tab above the text window.
3. Highlight the text to which you want to link the document.
4. Click the hyperlink icon  in the formatting menu.
5. Select URL in the Link Type drop down list.
6. Select the correct protocol (typically http://).
7. Click the blue Browse Server  button.
8. Click the Upload option in the File Browser window.
9. Click Choose File.
10. Browse to the desired file on your computer.
11. Click on your file and select Open.
12. Click Upload.
13. Your file will appear in the list of uploaded files. The file will be highlighted in blue, indicating that it is already selected.
14. Click Insert File.
15. Click the Target tab.
16. From the drop down list, choose New Window (_blank).
17. Click OK.
18. Scroll to the bottom of the page and click Save.
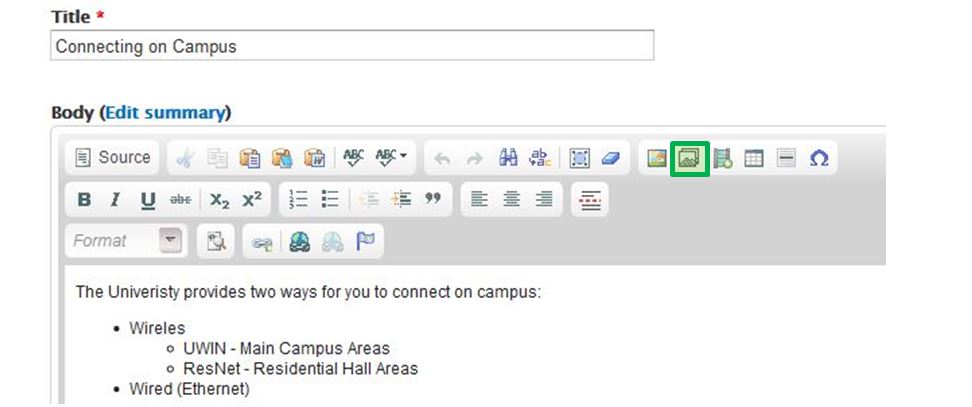
Adding an Image to Page Text
*Note: Before adding photos to your site, be sure they are resized to no more that 600 pixels wide. This will ensure that your site loads quickly and that the photos are easy to manipulate in the CMS. The easiest way to resize a photo is: http://www.picresize.com/. Browse for and upload your photo and click "continue". Choose "resize" and if one of the percentages sizes is still too large, choose "custom size.." and enter the number 600 in the box asking for width. Save as a .PNG file (this type of file looks better on the web) and then click "I'm done, re-size my picture." When the new page opens, click on the "Save to disk" and it will download to your computer. Download printable instructions for using PicResize.com.
1. Using the main menu, go to the page to which you want to add a picture.
2. Click the Edit tab above the content window.
3. Click on the Add media button.
4. Click on Browse and locate the file on your computer.
5. Select the image and click Open.
6. Click Submit.
7. In the “Current format is” drop down menu, select “Original.”
8. For accessibility reasons, give your image a meaningful description.
9. Click Submit.
10. Right-click on the image.
11. Select Image Properties.

12.
You can set the image dimensions if you desire.
• Clicking the Lock icon will look the image proportions and keep it from becoming distorted.
13. Type “10” in the HSpace and VSpace boxes.

14. Set your desired alignment.
15. Click OK.
16. Drag your image to its desired location.
17. Select Save at the bottom of the screen.
Unpublishing/Publishing a Page
Pages are set to automatically publish once they are created and saved. If you are not finished working on the page or if the information on the page is not relevant at this time, you can unpublish it so that it can not be viewed by the user.
To unpublish a page:
1. Navigate to the page you wish to unpublish.
2. Select the Edit tab.
3. Scroll down until you see a menu on the left side of the screen, and select Publishing options.

4. Uncheck the Published box.
5. Select Save.
To republish a page:
1. In the admin toolbar, click on Content.
2. Scroll down until you locate the page.
*Hint: You can filter for unpublished content in the drop down above the content list.
3. Click on Edit next the page title.
4. Scroll down until you see a menu on the left side of the screen, and select Publishing options.
5. Check the Published box.
6. Select Save.